
Most of web applications need to authenticate their users. Basic django login system uses username and password for authentication, but which user loves another password to remember? Thankfully, users may be authenticated with a well-known password, provided they have a social network account. Let’s start our django registration tutorial with a login via google example.
Django user registration via Google
Hereafter we’ll talk about the most recent Django version: 1.11. The right tool to do the job is python-social-auth. It’s got extensive documentation, however the reading flow isn’t very obvious. So, let’s see how to get a working configuration with a minimal effort.
Configuring python-social-auth
First of all add the lib to your pip requirements file and install into project virtual environment. The package name: social-auth-app-django. You’ll need to add the next configuration entries to the django config (usually settings.py):
INSTALLED_APPS = [
    # ...
    'social_django',
    # ...
]

AUTHENTICATION_BACKENDS = [
    'social_core.backends.google.GoogleOpenId',
    'social_core.backends.google.GoogleOAuth2',
]

SOCIAL_AUTH_GOOGLE_OAUTH2_KEY = '%some_digits_and_letters%.apps.googleusercontent.com'

SOCIAL_AUTH_GOOGLE_OAUTH2_SECRET = '%another_digits_and_letters%'
Nevermind the last two entries, they are dummies for now. In the next section we’ll see how to set them properly.
The last step of the minimal configuration is the root urls.py:
urlpatterns = [
    url('', include('social_django.urls', namespace='social')),
    # ...
]
For the complete set of options refer the lib docs for django framework. And now it’s time to make google ready to meet our users.
Configuring google side
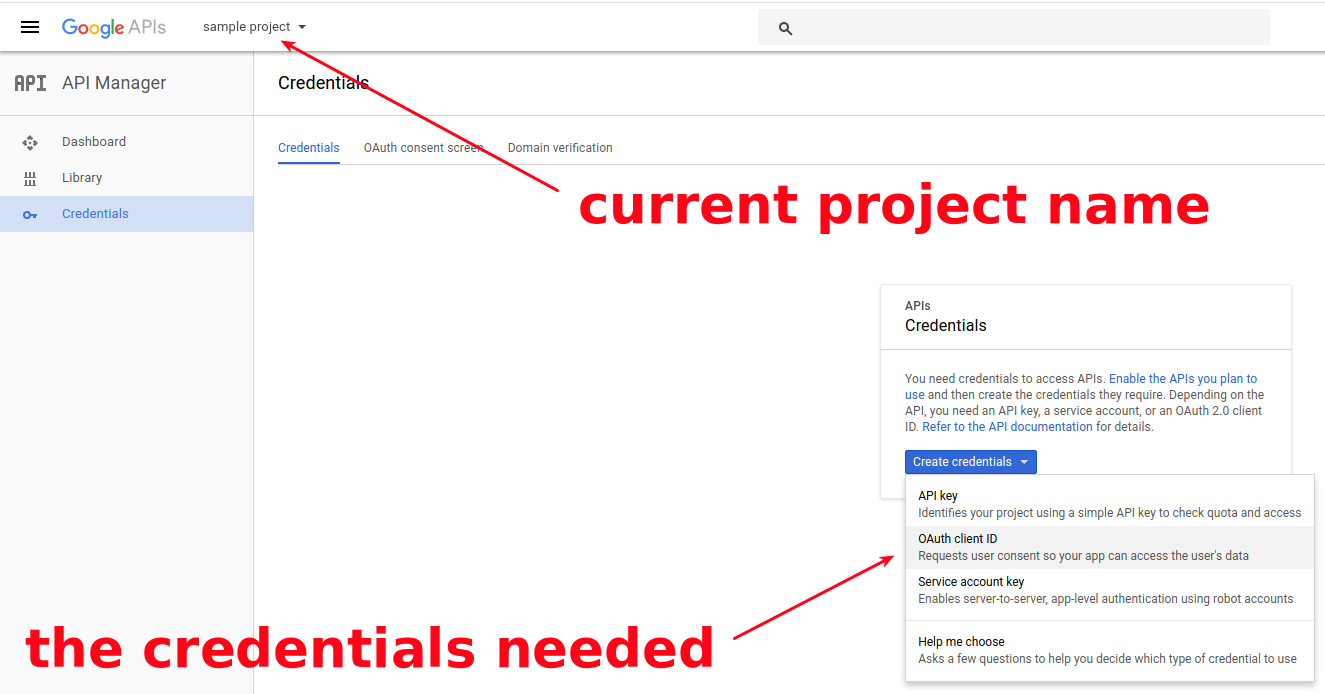
You’ll need a google account to visit Google API Console. There create a project with suitable name and switch to “Credentials” section on the left.
First, fill basic info about your project in the “OAuth consent screen” subsection. After proceed to the “Credentials” subsection.
Now you should see the blue “Create credentials” button with a drop down. Choose “OAuth client ID”, as on the screenshot:
Select “Web application” for the “Application type” and type any suitable name of your web app.
The most important part is to configure “Authorized redirect URIs”. It’s the set of URIs where users will be redirected after the authentication. Set to http://127.0.0.1:8000/complete/google-oauth2/ to test locally.
Attention!
Despite the deploy is out of this tutorial scope, notice that “Cannot be a public IP address.” is not a joke. You have to get a public domain name of any level to make your app working on a server. Don’t forget to add http://your.domain.name.com/complete/google-oauth2/ here. You’ve been warned.
You should end up with a “client ID” which goes to SOCIAL_AUTH_GOOGLE_OAUTH2_KEYand “client secret” which goes to SOCIAL_AUTH_GOOGLE_OAUTH2_SECRET.
However, our adventures at google console are not over. We have to specify which exactly google APIs will be accessible by our app. Go to the “Library” section, “Social APIs / Google+ API” and press blue “Enable” button on the top. That’s it. Congratulations! One may compare the simplicity of description with:
Basic views
The last thing left to see it all in action: django views. Some simple templates are assumed, if you wish them.
Add this to your root urls.py:
from django.contrib.auth.views import LogoutView, LoginView


urlpatterns = [
    # ...
    url(r'^$', views.index, name='index'),
    url(r'^login/$', LoginView.as_view(template_name='login.html'), name='login'),
    url(r'^logout/$', LogoutView.as_view(), name='logout'),
    # ...
]
Import views from any django-app of your project. Then add there the index view for main page, if it’s not there:
from django.contrib.auth.decorators import login_required
from django.http import HttpResponse

# ...

@login_required
def index(request):
    return HttpResponse('OK, Google!')
Notice the login_required decorator. Now our page is locked from anonymous visitors. They are redirected to the login page. Let’s specify its name in settings.py:
LOGIN_URL = 'login'
LOGIN_REDIRECT_URL = 'index'
LOGOUT_REDIRECT_URL = LOGIN_REDIRECT_URL

# Password validation
# https://docs.djangoproject.com/en/1.11/ref/settings/#auth-password-validators

AUTH_PASSWORD_VALIDATORS = [
    # ...
]
The good place to put this in is right before the password validators in default config to get all the auth stuff together.
Attentive reader will ask: “Hey, what about login.html template?”. This could be the simplest django login form ever:
Sign in with GoogleThe next GET-parameter trick is needed to redirect user back to the page that required to be logged in.
Now run your project locally and try to visit the default local address: http://127.0.0.1:8000/. You should be redirected to the login page with a single button “Sign in with Google”. Proceed with authentication and after you should be redirected back to the root URI and see what our protected index view returns. You haven’t even had to create a django registration form! Isn’t it great?
OK, Google! But what if your web app has its own RESTful API? How authentication can be implemented then? See the next section!
Django REST framework authentication
To be precise, here we talk about the third version of the framework.
First, let’s consider the simplest use case: when client-side of your web app sends ajax requests to the web app API. You’d be completely happy with the default DEFAULT_AUTHENTICATION_CLASSES setting.
'rest_framework.authentication.SessionAuthentication' is already here: logged in the web app == logged in the api. Nothing to configure!
The more complicated case is when you need to provide access to some external app, usually mobile or desktop one. Good approach here is to use token authentication. After setting this up as described in the DRF doc you’ll need to set HTTP header “Authorization” with value “Token 9944b09199c62bcf9418ad846dd0e4bbdfc6ee4b” for each request to the API from external app. Real token value denotes specific user in your django project.
There’s a way to obtain token from external app. You don’t need to build a django login form, but you’ll have to provide an endpoint receiving user credentials and returning respective token. Follow the instruction in the DRF docs to see how.
You might also want to consider using JWT and a DRF plugin for it. JWT is somewhat harder to setup, but it's more secure and flexible han basic token based authentication.
Django authentication in tests
Often we need to make requests by authenticated user. Naive approach could be to use test client login method. I’ve even met custom wrapper in the base class, something like:
def login_user(user):
    self.assertTrue(self.client.login(username=user.username, password=TEST_PASSWORD))
Bulletproof. Well, and time-wasting. Don’t do this. More efficient way: self.client.force_login(user)
Conclusion
Let’s recap what have we highlighted in django user registration and authentication:
- Now you know how to register users with their google+ accounts, as straightforward as possible.
- Authentication for RESTful API is needed? You’re armed and ready! Even to automatically generate tokens for external apps.
- No more redundant authentication in tests, using credentials. Only forcing in tests. Only hardcore.
All of this is not emphasized too much in docs, is it? If you liked this article, stay tuned with our blog - even more enlightening articles are coming soon. Also feel free emailing me with any questions regarding software development or contact in any other way suitable for you. See ya!
Subscribe for the news and updates
In our article, you will find the best JavaScript framework comparison so that you know for sure how to choose the right one for your project.

Designing database architecture is a challenging task, and it gets even more difficult when your app keeps getting bigger. Here are several tips on how to manage your data structure in a more efficient way.

Programmatic generation of PDF files is a frequent task when developing applications that can export reports, bills, or questionnaires. In this article, we will consider three common tools for creating PDFs, including their installation and converting principles.

Nowadays, when every second large company has developed its own instant messenger, in the era of iMessages, Slack, Hipchat, Messager, Google Allo, Zulip and others, I will tell you how to keep up with the trend and write your own chat, using django-channels 0.17.3, django 1.10.x, python 3.5.x.

When we use css-sprites it's important to make browser cache them for longest period possible. On other hand, we need to refresh them when they are updated. This is especially visible when all icons are stored in single sprite. When it's outdated - entire site becomes ugly.
In my current project I had a task to use twitter API. Twitter uses OAuth for authentication, which is pretty dreary. To avoid fiddling with it all the time, I've moved authentication to decorator. If key is available - nothing happens, just view is launched as usual. It's convenient that there's no need for additional twitter settings in user profile. Code is in article.