

While working on Olivia We were given a task to create an interactive interface with a widely customized visual look and different filtering to view reports.

One of the main requirements was the ability to customize the visibility of the columns. Beyond this, it was necessary to implement:
- Sorting by specific columns
- Filter as a sidebar
- Filter as tabs
- Column width adjustment
- Search
At the same time, a general look of the table and a large part of the functionality had to remain the same regardless of the displayed type of data.
Of course, we wanted to do it reusing as much code as possible and get a kind of universal tool that could be easily integrated wherever it was needed.
Since the forming of report occurred on a server using Django, the back-end issue was partly resolved. However, different technologies could also be applied to the interface implementation where the quality and speed of accomplished task has been determined by the right choices we made.
One of the options was a server-side rendering of templates and inserting of the resulting html to the desired location on the page. However, this could lead to a serious loss of speed and create a complex and hardly supported template logic.
There are lots of ways to transfer data from client to the server and back. As you might guess from the title, our choice is AngularJS. AngularJS, just as Django, provides excellent opportunities for writing well-structured apps with easily deployed extensions. In both cases, a great many of commonly used mechanisms and possibilities for testing the written code have been implemented.
Let’s simply go through some key aspects of the implementation of a client-server communication and focus on the interface. Generally, in this connection, the settings in operation can be carried out in different ways, and each of them is described in some extent. Some even involve programming layers that allow adjusting the interaction more easy. We will discuss one of such methods here.
Django and REST
Pure Django is not suited to work with the REST API, but there are extensions that allow easily adding the necessary functionality to the project.
We have chosen the Django Rest Framework (DRF). This is a powerful and flexible toolkit for creating and interacting with Web API. Using this framework, endpoints have been described and the server-side work has been made with the proper setup and configuration.
Compared to Tastypie (the Django Rest Framework main competitor), DRF has some advantages:
- Good integration with Django (based on Class-Based Views)
- Greater flexibility and easier customization
- More reliable authentication system
Routing to REST endpoints
To tie it all together, we have used the js-routes extension for Django. On the client side, it allows getting a list of all routes names described in back-end, and accessing to them, same way as it is done on the server. This works with a decorator function for the AngularJS built-in service like $http and generally it allows to make queries, for example, to see the list as:
$http.dget('url-name', params)Where "url-name" is the name of the pattern in the server config of js-routes, and "params" contains query parameters. The result of the call is a ‘promise’ that will contain data received from the server. Such precise writing has been achieved thanks to the use of our self-written shortcut, expanding the functional $http:
$provide.decorator '$http', ($delegate) ->
  dhttpErr = angular.$$minErr 'djangoHttp'
  reverse = (url) ->
    reverseParams = if angular.isArray url then url else [url]
    url = django_url_reverse reverseParams...
    if typeof url == 'undefined'
      throw dhttpErr 'URL not found'
    return url

  shortcut = (method) ->
    (url, params...) ->
      params = [reverse url].concat params
      $delegate[method] params…


  for method in ['get', 'post', 'put', 'delete', 'patch']
    $delegate['d' + method] = shortcut method
This code gives access to the standard methods like $http by adding the "d" letter to their name, and accepts the name of the route as the first argument.
Architecture of the Report Directive
We decided to split a directive to several separate components. This approach has clear benefits: Depending on the situation, only the particular parts can be used You do not have to clutter up the original code when writing additional plug-ins Code of each directive is clear and simple
As a result, we use a set of the following directives to report a task:
- Table
- Sidebar filter
- Upper panel filter
- Search
- Columns appear configuring
Table
This directive deals with actual data representation. From the outside, the directive receives the following parameters:
- Endpoint name to download data
- Query parameters
- Columns configuration
- Key – a field in the api
- Name – a column title in the table
- SotringKey – a sorting key on the server
- Show – a visibility flag of the column by default
- Sortable – a sortable column flag
- Width – a default width of the column
- Template – the path to the template, if you need a special type of representation
- CellClass – the name of the css class columns
Directive code:
common.directive('ourTable', ['$window', ‘dataService’, ($window, dataService) ->
  scope: {
    tableData: '='
    params: '='
  }
  templateUrl: STATIC_URL + 'html/table/table.html'
  link: ($scope, $elm, $attrs) ->
    reloadData = (nVal, oVal) ->
      $scope.tableData.items = dataService.load($scope.tableData, $scope.params)
    $scope.$watch('params', reloadData, true)
])
Here, we will initiate the data download from the server and add them to the $scope.tableData.items
Data acquisition service:
common.factory('dataService', ['$http', ($http) ->
  class DataManager

    load: (tableData, params) ->
      queryParams = {params: params}
      return $http.dget(tableData.apiName, queryParams)

  return new DataManager()
Template:
<table class="table">
  <tr class="tablehead">
    <th ng-repeat="column in tableData.columns" ng-if="column.show" title="{{ ::column.name }}"
      ng-style="::{'width': column.width}" ng-class="columnClasses(column)">
      <p ng-click="order(column)">{{ ::column.name }}</p>
    </th>
  </tr>
  <tr class="table-row" ng-repeat="item in tableData.items" ng-class="::tableData.trClass(item)">
    <td ng-repeat="column in tableData.columns" ng-if="column.show"
      ng-style="::{'width': !tableData.header && column.width}">
      <ng-include src="::(column.template || 'html/cell/cell.html')"></ng-include>
    </td>
  </tr>
</table>
Note that we use a one-time binding expression for the procedure that does not change during the table usage.
As I said before, the directive is simple and clear. Other functionality is achieved by using additional components which change the columns configurations and query parameters externally.
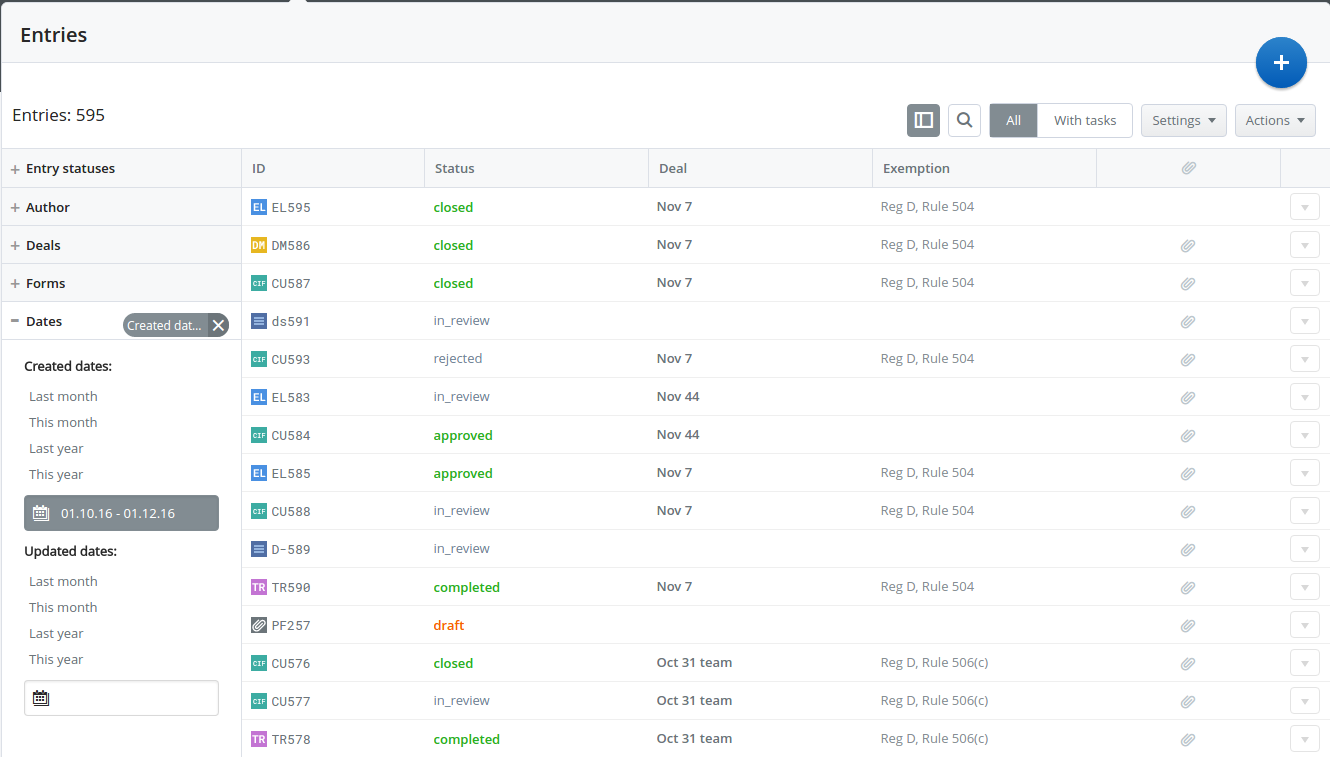
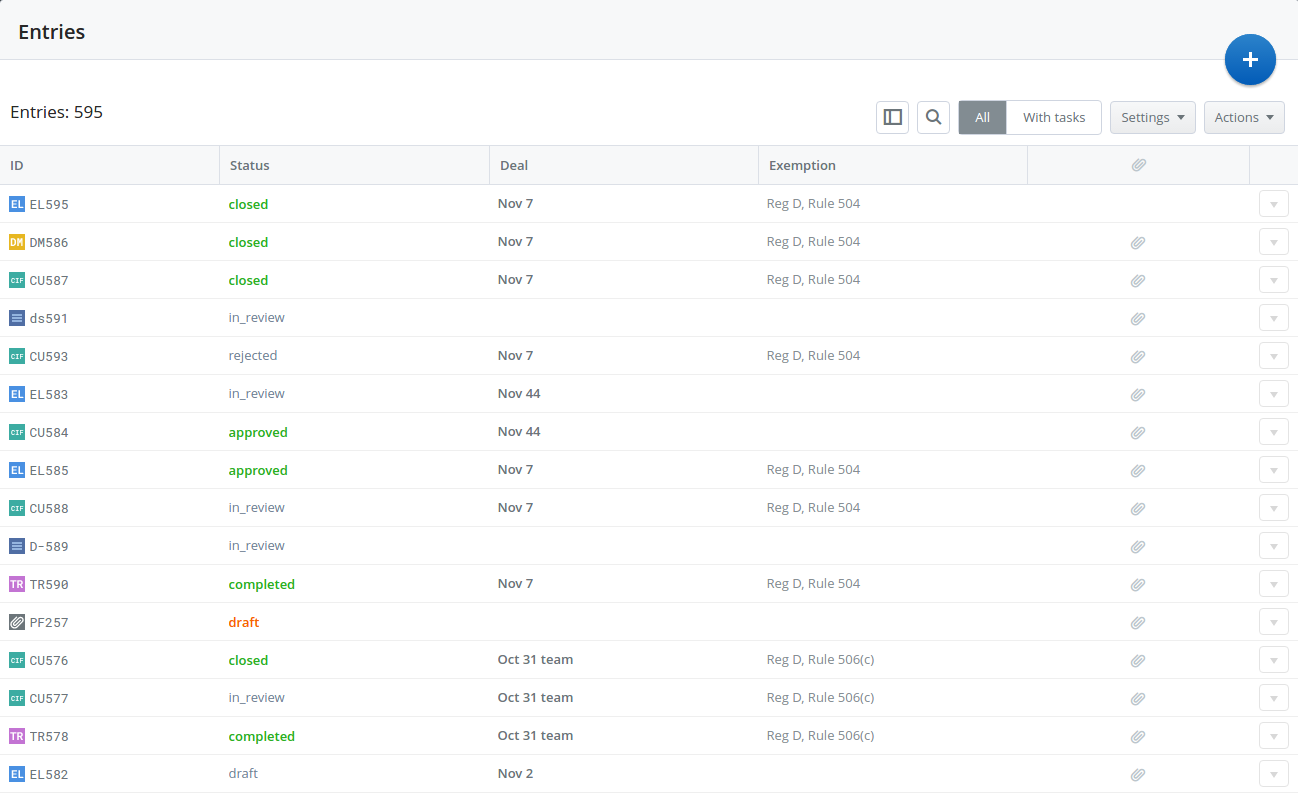
Сonfiguration and Table Example
The image below shows an example of transaction reporting tables. It was necessary to implement all the basic functions. Especially, the aim was to use a separate template to display a column with a status, where at the same time the icon and text will appear. Further, what follows is a description of the columns configuration in the code. Generally, to display the table is the only thing that it is necessary to do.
Columns configs:
$scope.tableData = {
  title: 'Transactions',
  apiName: 'transaction-list',
  columns: [
    {
      key: 'id',
      name: 'ID',
      sortable: true,
      show: true,
      width: 106
    },
    {
      key: 'status',
      name: 'Status',
      sortingKey: 'status',
      show: true,
      sortable: true,
      template: STATIC_URL + 'html/table/cell/status-cell.html'
      width: 116
    },
    {
      key: 'name'
      name: 'Title'
      sortable: true
      show: true
      width: 242
    },
    {
      key: 'deal',
      name: 'Deal',
      sortingKey: 'dealname',
      sortable: true,
      width: 198,
      cellClass: 'tablename'
    },
    {
      key: 'buyer'
      name: 'Buyer',
      sortingKey: 'buyername',
      show: true,
      sortable: true,
      width: 177

    },
    {
      key: 'seller',
      name: 'Seller',
      sortingKey: 'sellername',
      show: true,
      sortable: true,
      width: 177
    },
    {
      key: 'currency_amount',
      name: 'Amount',
      sortingKey: 'amount',
      show: true,
      sortable: true,
      width: 142,
    }
  ]
}
Thus, it was possible to make the most of the reuse of code: it was enough to describe the columns configs, the API address and a custom template for the cell (when necessary) to display various types of data. And a comprehensive table is available for use!
Moreover, the transmission of parameters in scope that gives access to the api allows to set up a flexible interaction with external filters. For example, if you want to do the sorting or filtering on one of the fields:
In this case you have to use the date: it is sufficient to apply in the selector the passed parameters and indicate them as selected value. Watcher will work by the indicated parameters, make a request to the backend and then refresh the table content.
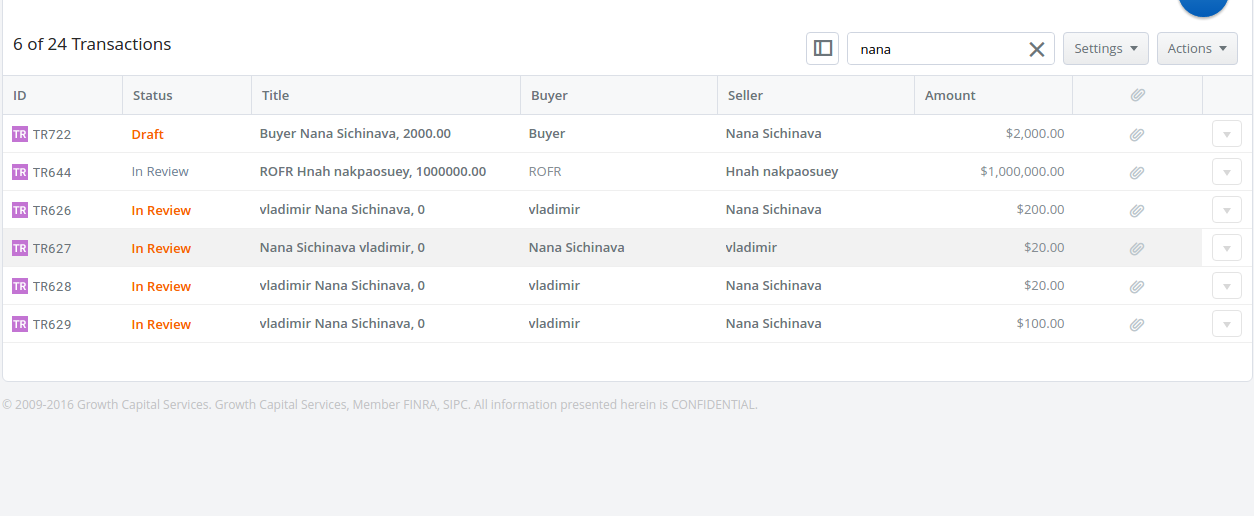
Search
This directive can simply add a search term in the query parameters.
Directive
common.directive('tableSearch', ['STATIC_URL', (STATIC_URL) ->
  replace: true
  scope: {params: '='}
  templateUrl: STATIC_URL + 'html/table/search.html'
  link: ($scope, $element, $attrs) ->
    inputElem = $element.find('input')
    clearElem = $element.find('.js-search-clear')

    $element.on 'click', ->
      $element.addClass('search-opened')
      $element.find('input').focus()

    inputElem.on 'blur', ->
      setTimeout( ->
        if not $scope.params.search
          $element.removeClass('search-opened')
          clearElem.removeClass('is-active')
      , 1000)
    inputElem.on 'keypress', ->
      clearElem.addClass('is-active')
])
Template
<div class="toggle-btn js-search-table">
  <input type="search" placeholder="Search table" ng-model="params.search"
    ng-model-options="{debounce: {default: 500, blur: 0} }">
  <i class="icon icon-zoom"></i>
  <i class="icon icon-close search-close js-search-clear" ng-click="params.search = ''"></i>
</div>
With the modified query, the table component will reload the data.
Column visibility
Directive code:
common.directive('tableSettings', ['STATIC_URL', (STATIC_URL) ->
  scope: {
    columns: '='
  }
  templateUrl: STATIC_URL + 'html/table/settings.html'
])
Template:
<div class="dropdown is-filter js-dropdown">
<p class="dropdownitem">Settings</p>
<div class="dropdownlist is-top-level js-inner js-check">
<div class="dropdowncheck" ng-repeat="column in columns">
<label class="check" data-attr="id">
<input type="checkbox" ng-model="column.show">
<span class="check__span" ng-bind="::column.name"></span>
</label>
</div>
</div>
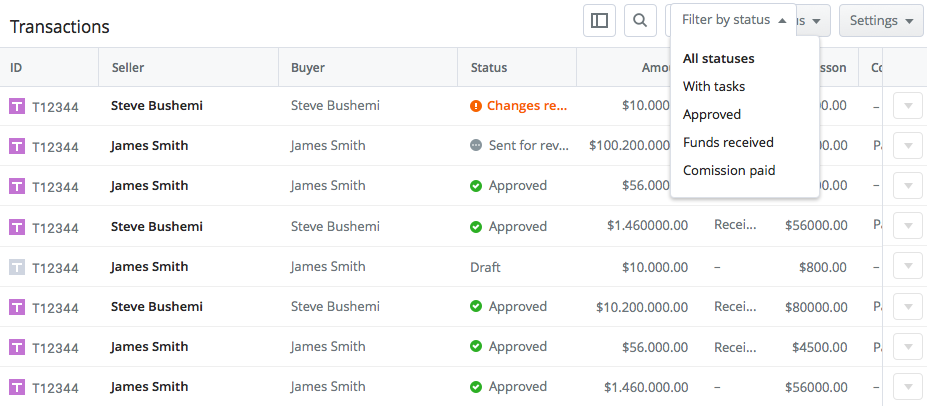
</div>Filtering
Side and upper filtering were implemented as separate directives according to the same principle. The same universal mechanism was used to display and view different types of data that allow quickly and easily to set up the visual look and all the necessary parameters.
Optimization
You may also see, we use deep comparison of the variables to track the parameters change:
That shows a sufficient performance with our data, but you may want to wrap the object parameter in the Immutable and to make a shallow comparison instead.
Summary
As a result, we briefly described the technologies used in the project which were:
- Django
- DjangoRestFramework
- AngularJS
As well, we gave examples of code that helps to create a flexible and universal output data system to set up interactively the visual look and filtering. Of course, these examples do not address such basic issues as customizing the server side and initializing the front-end, but these issues are well-documented and finding solutions to such questions is not a problem.
Also, we didn’t review the mechanism of adding and editing the objects, but they usually have specific attributes depending on a particular project and certain type of data. It's worth mentioning that the tools we used when developing such kind of interfaces proved to be excellent and quite simply they just work in real life projects.
It's great that there are such good things in the open source software and they are intensively developed and supported by community.
Subscribe for the news and updates
This article offers key insights into the ISTQB certification and shares a proven preparation strategy to help candidates succeed.

SQL is a fairly complicated language with a steep learning curve. For a large number of people who make use of SQL, learning to apply it efficiently takes lots of trials and errors. Here are some tips on how you can make your SELECT queries better. The majority of tips should be applicable to any relational database management system, but the terminology and exact namings will be taken from PostgreSQL.

Protection of WEB App is of paramount importance and it should be afforded the same level of security as the intellectual rights or private property. I'm going to cover how to protect your web app.

In this article, we will compare two most popular JS Libraries (Angular vs React). Both of them were created by professionals and have been used in famous big projects.

When we use css-sprites it's important to make browser cache them for longest period possible. On other hand, we need to refresh them when they are updated. This is especially visible when all icons are stored in single sprite. When it's outdated - entire site becomes ugly.
Learn how to use "OR" and "AND" queries efficiently in Django without using database models Q. Enhance your query-building skills. Dive in now.