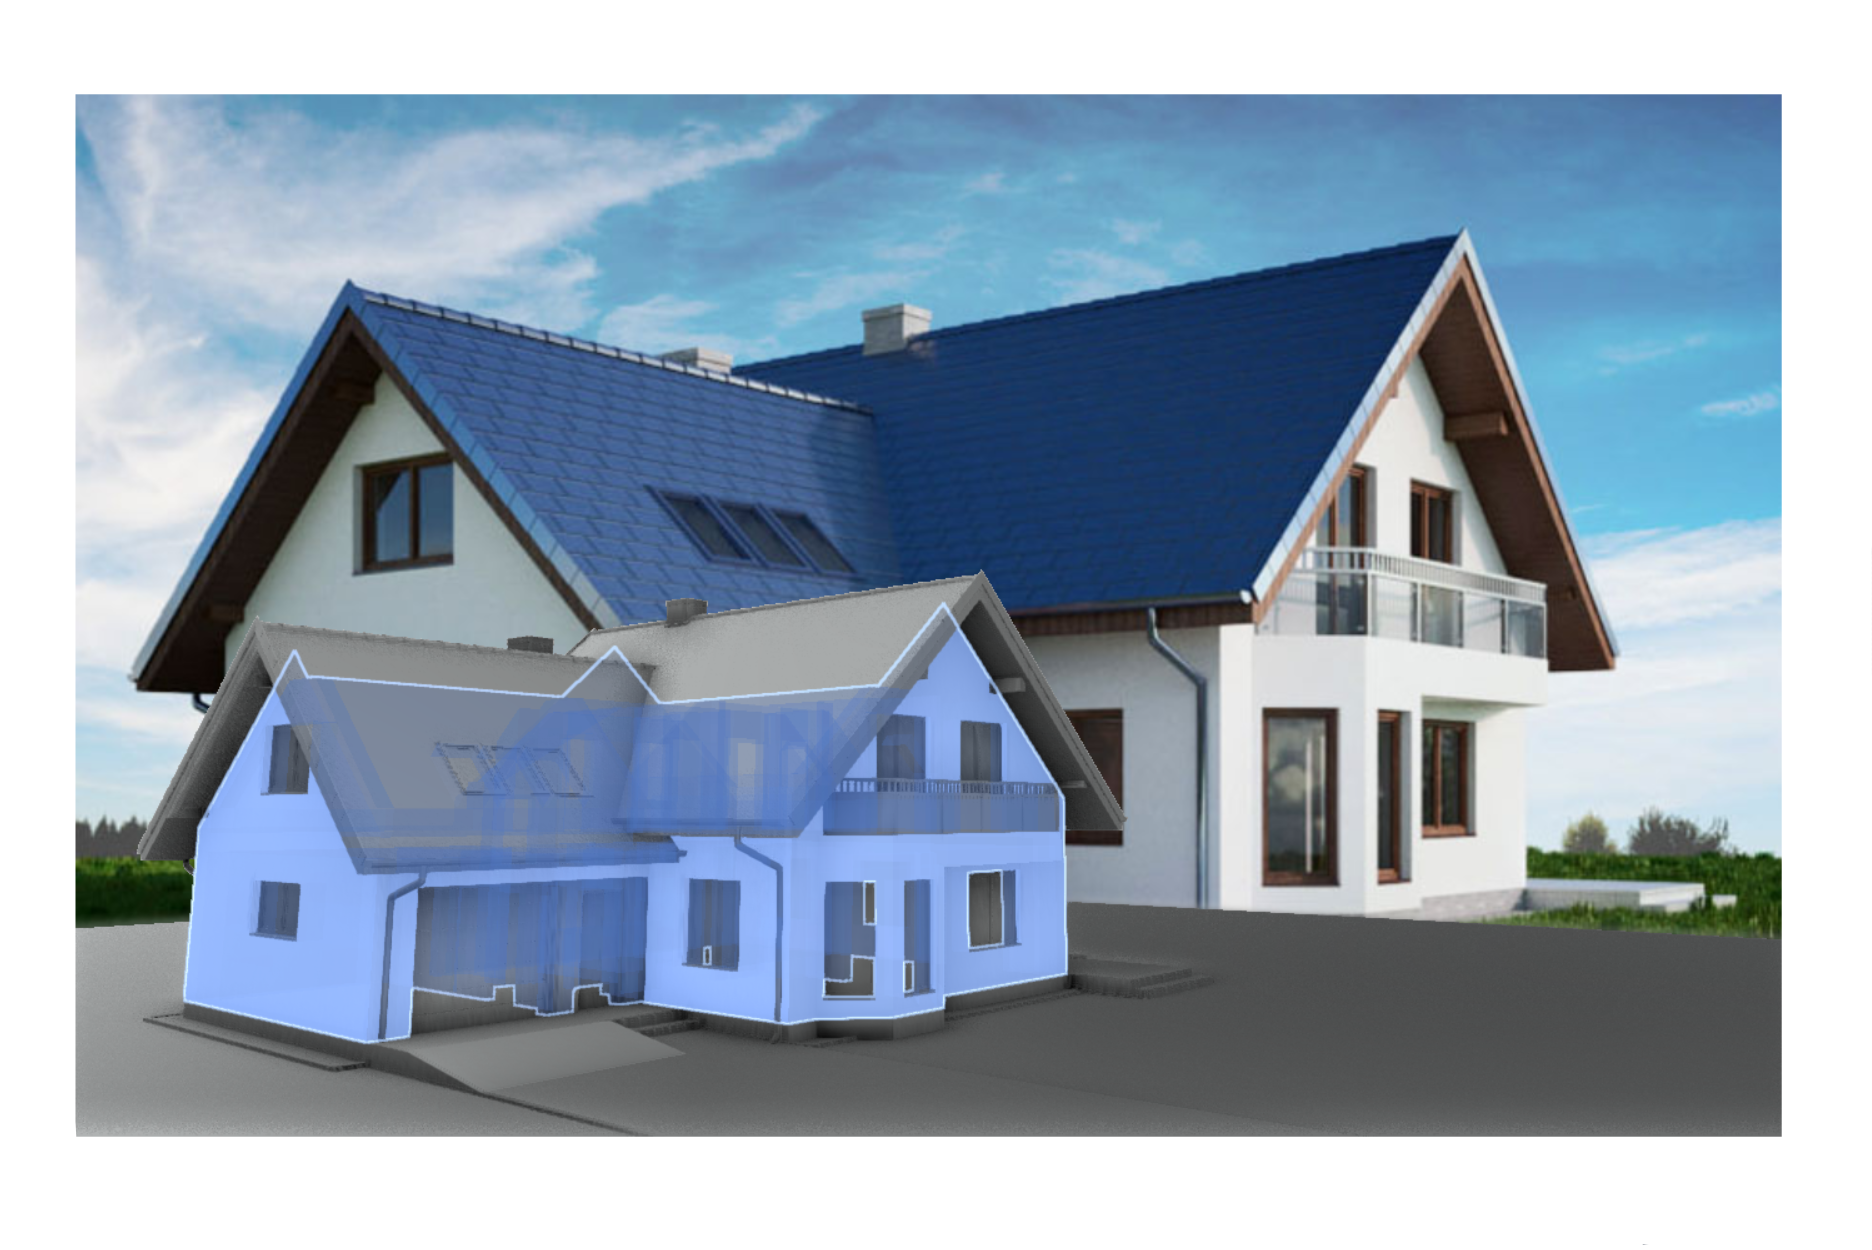

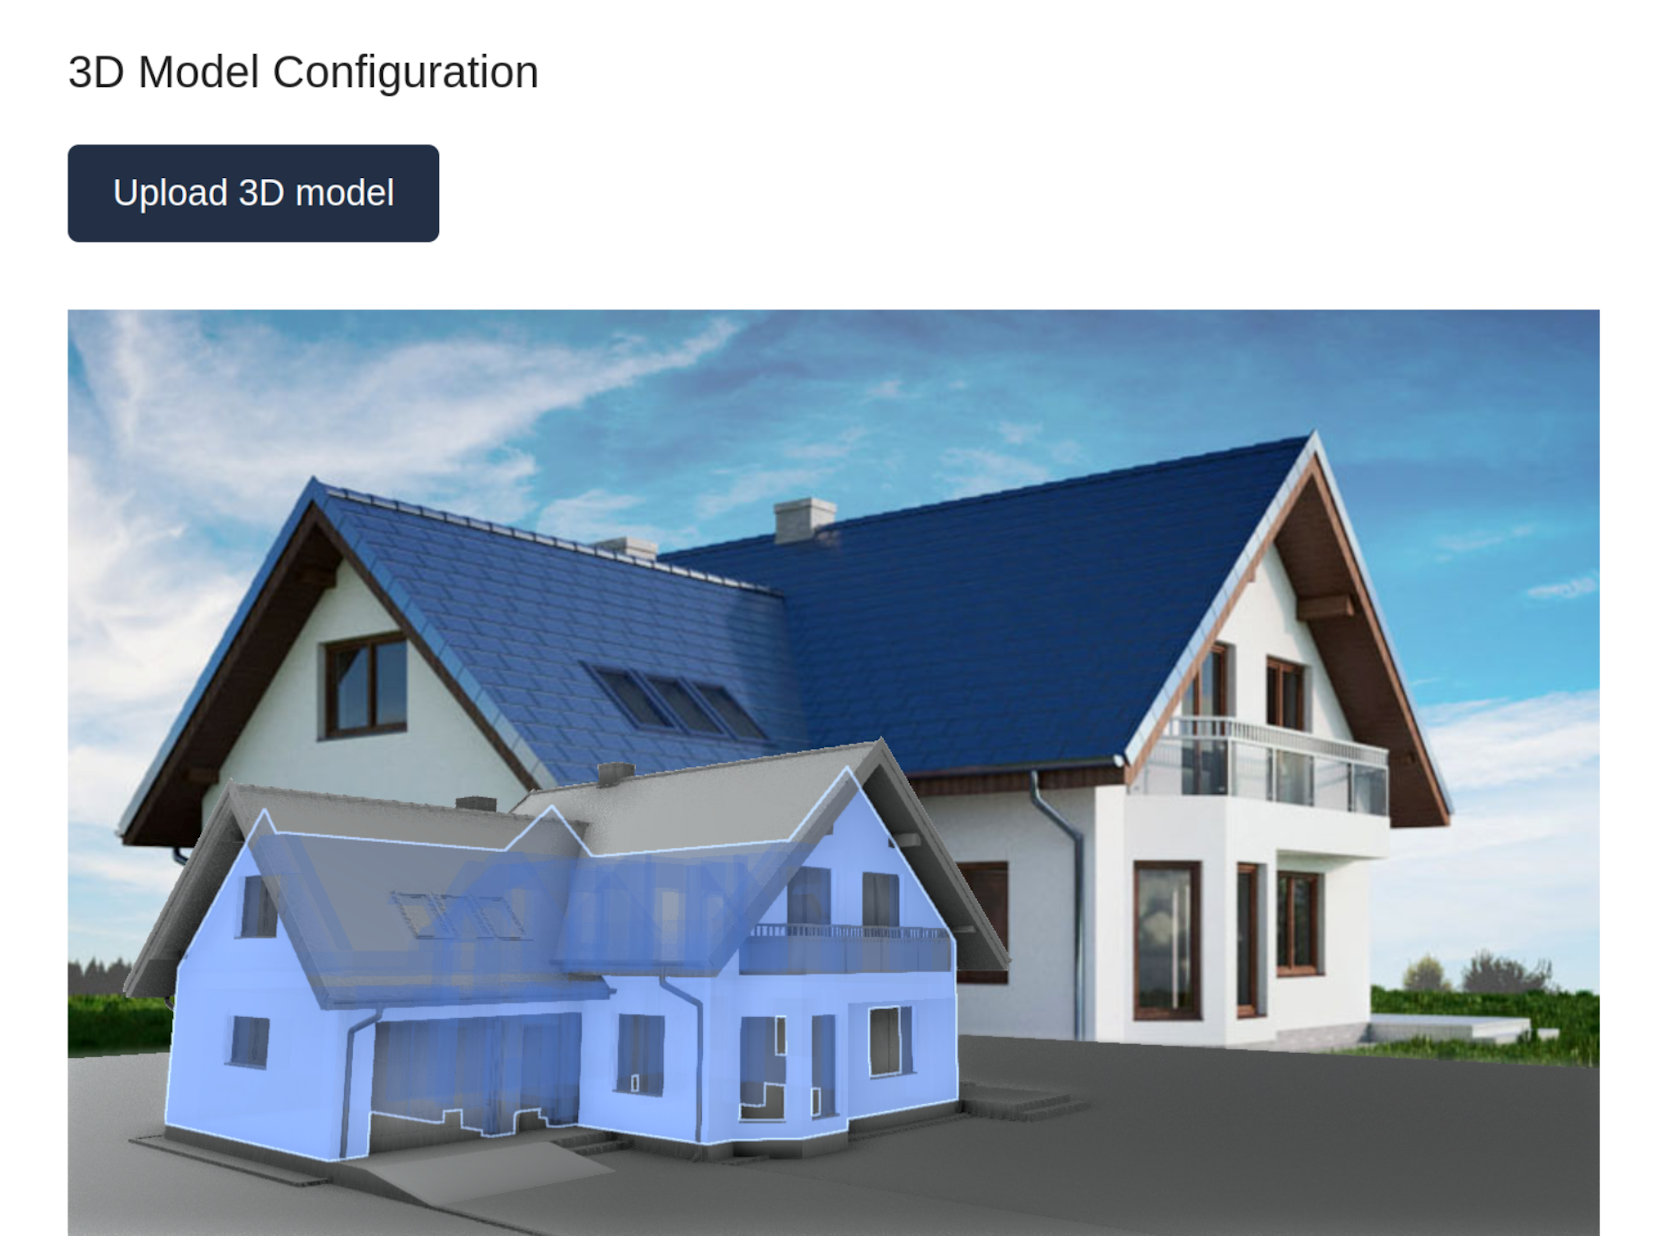
Once we received an interesting task from a client. They needed to allow their users to upload a 3D model of the building and show it in a timelapse video from the construction site.
To display 3D models after a short search, the choice was made in favor of Autodesk Forge Viewer. To understand just a small part of Forge Viewer's capabilities, you can look at the demo for yourself. Forge Viewer works with a huge number of formats, allowing you to render a 3D model directly in the browser and control the scene camera, just like in any desktop 3D editor. This is exactly what we were looking for.
REQUIREMENTS
To integrate with the Autodesk Forge API and Forge Viewer, we need:
https://www.npmjs.com/package/forge-apis
https://developer.api.autodesk.com/modelderivative/v2/viewers/2.*/viewer3D.min.js
You may be surprised that we have included a direct link to the Forge Viewer instead of providing a link to the js library. This is due to library limitations*
(*Usage Limitations: The Autodesk Forge Viewer JavaScript must be delivered from an Autodesk hosted URL).
Also if you are using TypeScript you will need the following:
https://www.npmjs.com/package/@types/forge-apis
https://www.npmjs.com/package/@types/forge-viewer
We will miss the moment of registration, setting up the Application, and creating a bucket, I'm sure you can handle it yourself. The only point I'll focus on in this section is the list of connected Forge APIs.
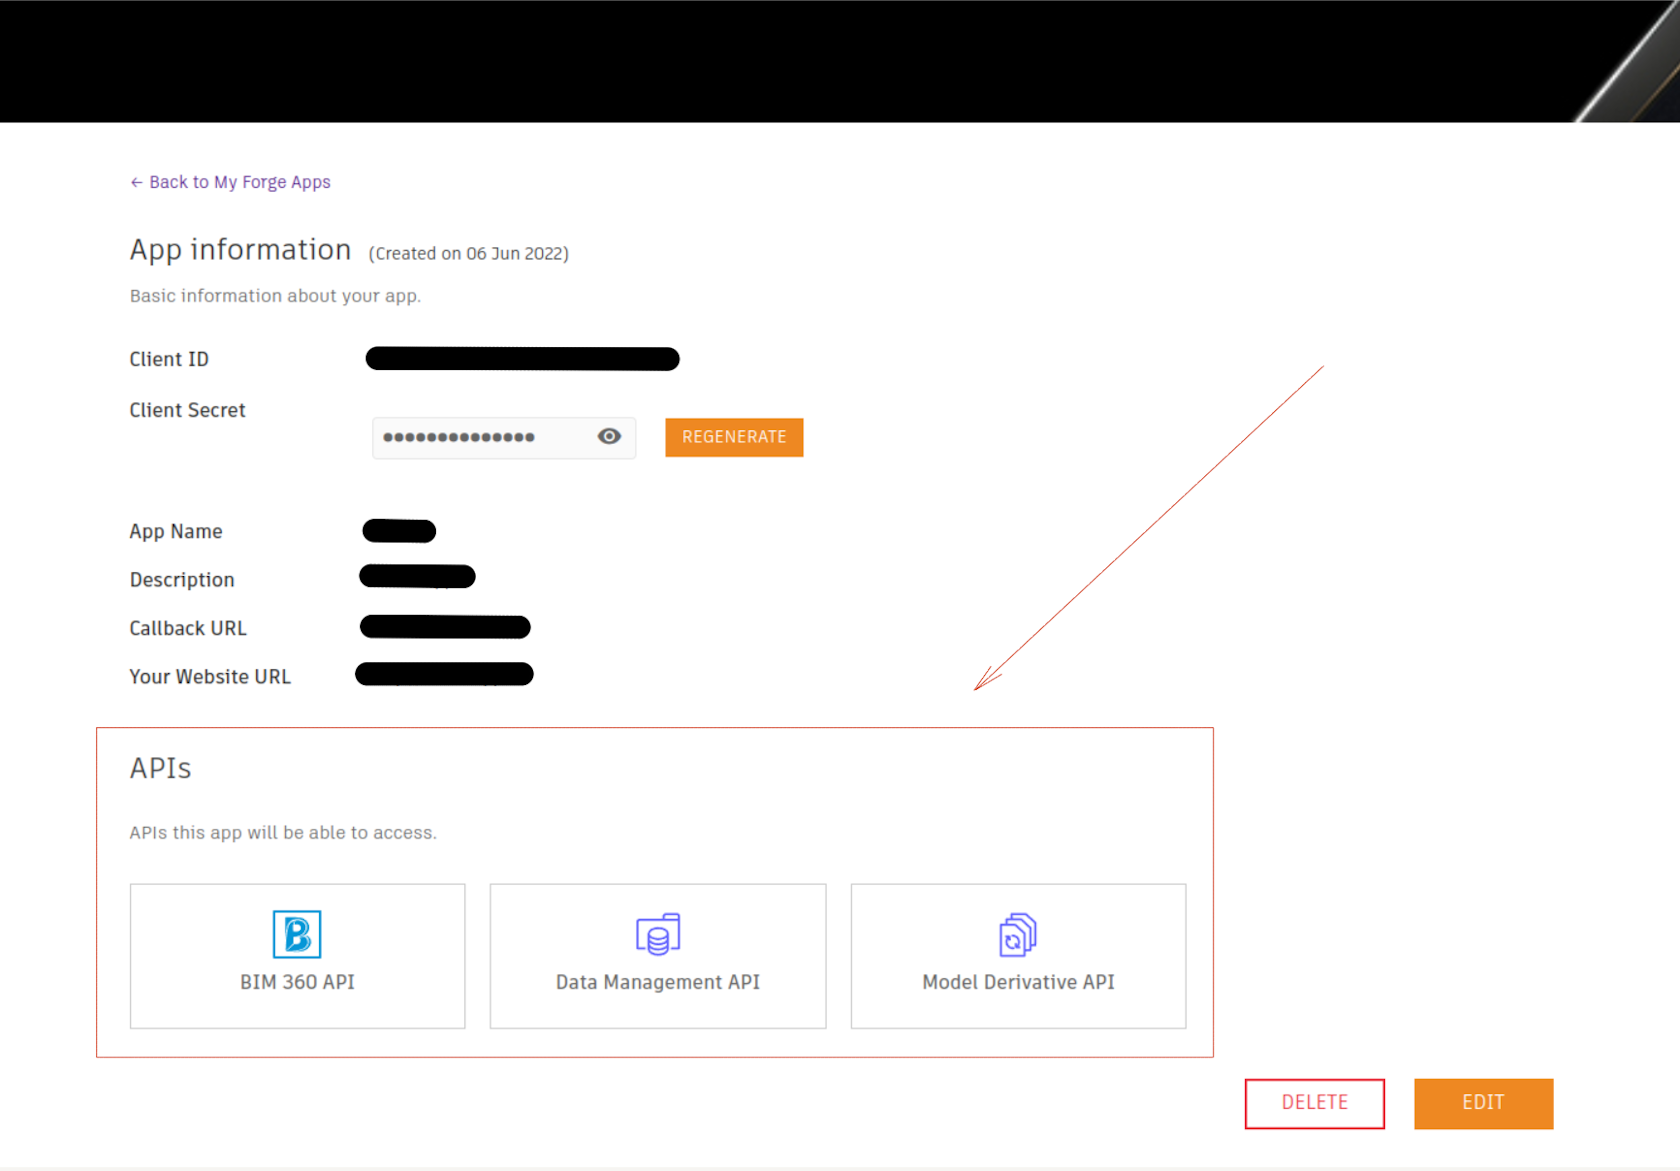
Your list of connected APIs must contain the APIs listed above, otherwise the examples described in the article will not work.
WORKFLOW
In general, the workflow looks like this:
- The client/server uploads a file with a 3D model to the Forge API and receives an Object ID (actually, this is the unique URN of the object).
- Because Forge Viewer works with .SVF/.SVF2 files, the 3D model must first be converted to its final format. Luckily, the Forge API provides an appropriate endpoint, so you just need to make an additional request to the Forge API and wait for the conversion process to complete. More on this will be written below.
- The client initializes the Forge Viewer and passes it an Object ID.
- Done!
AUTHENTICATION
import * as ForgeSDK from "forge-apis";

const scopes = [
 "data:read",
 "data:write",
 "data:create",
];

const auth = new ForgeSDK.AuthClientTwoLegged(
 "client_id",
 "client_secret",
 scopes,
 false
);
FILE UPLOAD
To upload a file to the Forge API, we need forge-apis:
const objectsApi = new ForgeSDK.ObjectsApi();

const uploadFile = async (file: File) => {
 const access_token = await auth.authenticate();
 const { body } = await objectsApi.uploadObject(
   "bucket_key",
   "building.obj",
   file.size,
   file, // File, string or Buffer object
   {},
   auth,
   access_token
 )
 console.log(body.objectId) // unique 3D model URN
 return body
}
The Forge-APIs SDK was designed for the Node server, but we decided to use the file upload method on the client side and found that .uploadObject() can accept not only a Buffer-object but also a File-object, regardless of the specified type in @types/forge-apis.
This solution will help you avoid memory consumption and unnecessary conversions from a File-object to a Buffer-object when uploading the file with 3D-model.
When the upload is complete, the Forge API returns an ObjectId, the file's unique URN. You will need it later. So save it, for example, in a database.
FILE CONVERSION
And so, we uploaded the file to the Forge API. Now it's time to convert it:
const derivativesApi = new ForgeSDK.DerivativesApi();

const convertToSVF = async (objectId: string) => {
 const access_token = await auth.authenticate();
 const urn = Buffer.from(objectId).toString("base64");
 return derivativesApi.translate(
   {
     input: { urn },
     output: {
       formats: [
         {
           type: "svf2",
           views: ["3d"],
         },
       ],
     },
   },
   // overrides previous derivative in case it exists
   { xAdsForce: true },
   auth,
   access_token
 );
}
Note that the Forge API accepts a base-64 encoded objectId.
After the task has been successfully created, we need to wait for it to complete before we can show the 3D model in the Forge Viewer:
const derivativesApi = new ForgeSDK.DerivativesApi();

const getSvfConversionStatus = async (objectId: string) => {
 const access_token = await auth.authenticate();
 const urn = Buffer.from(objectId).toString("base64");
 const response = await derivativesApi.getManifest(
   urn,
   {},
   auth,
   access_token
 );
 // "success", "inprogress", "pending", "failed", "timeout"
 return response.body.status;
}
SVF VS SVF2
Among the conversion options, there is a parameter that determines the final file format:
output: {
  formats: [
    {
      type: "svf2",
      ...
    },
  ],
},
You can use both SVF and SVF2, but I highly recommend using the second one. It takes a little longer to convert but consumes a lot less resources. Just look at the comparison table from the article.
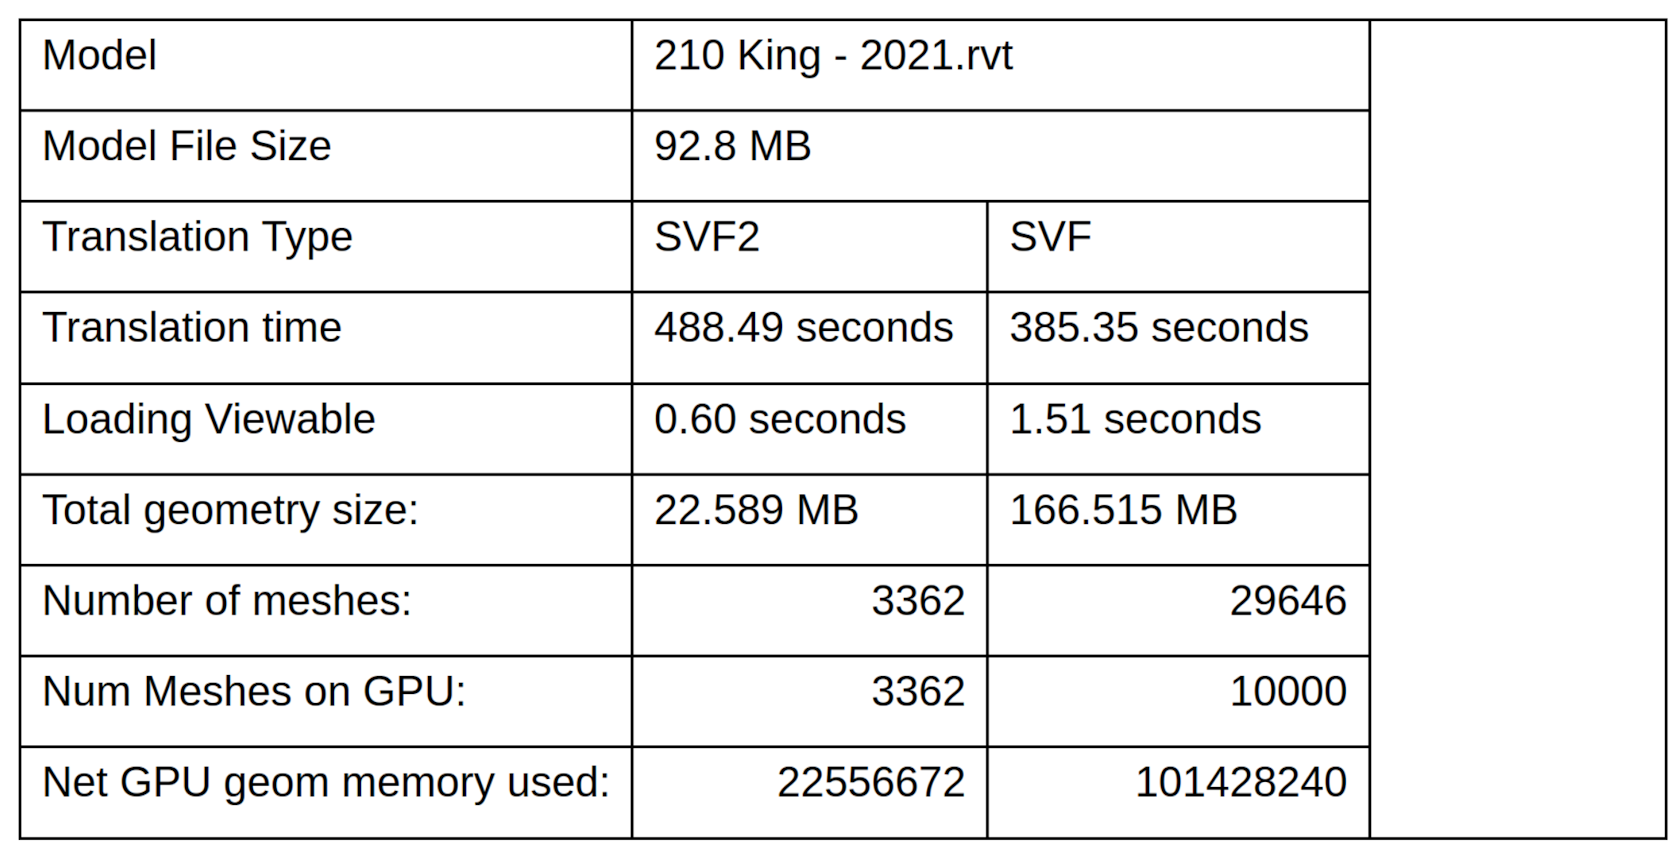
All of these parameters will certainly affect rendering performance in the user's browser. We decided to use SVF2 for our project and have never regretted it.
INITIALIZATION OF FORGE VIEWER
With the model converted, we can finally move on to displaying it. We won't duplicate the official documentation, please read it here and here.
However, since we needed to show the 3D model over the timelapse video, we needed to use some additional settings. Perhaps some of them will be useful to you.
We will pass all additional settings as initialization arguments:
Autodesk.Viewing.Initializer(options, () => {
   const htmlDiv = document.getElementById("forgeViewer");
   if (!htmlDiv) return
   const forgeViewer = new Autodesk.Viewing.Viewer3D(htmlDiv);
   // ... settings ...
};
Switch isometric to perspective view
By default, Forge Viewer often renders a 3D model in an isometric view. Since any camera shows objects in perspective, we needed to switch the Forge Viewer from isometric to perspective view:
forgeViewer.navigation.toPerspective();Hide background
We also ran into a problem. Forge Viewer always added a white background that overlapped our video. But this option can be disabled as follows:
forgeViewer.start(null, null, null, null, {
  webglInitParams: {
    alpha: true,
  },
});
// clear alpha channel
forgeViewer.impl.renderer().setClearAlpha(0);
// set transparent background, color code does not matter
forgeViewer.impl.glrenderer().setClearColor(0xffffff, 0);
// trigger rendering
forgeViewer.impl.invalidate(true);
Save-n-apply scene state
Our users themselves position the 3D scene camera in such a way that it shows the 3D object at exactly the same angle and distance at which the real camera is pointed at the building in the video. In order not to repeat the positioning procedure every time you load a 3D model, you can get and save the current scene settings to the database:
forgeViewer.addEventListener(
  Autodesk.Viewing.CAMERA_CHANGE_EVENT,
  (event: CameraChangeEvent) => {
    // handle scene state
    console.log(event.target.getState());
  }
);
And then just load them from the database and apply when initializing the Forge Viewer:
const onDocumentLoadSuccess = (viewerDocument: Autodesk.Viewing.Document) => {
  const defaultModel = viewerDocument.getRoot().getDefaultGeometry();
  void viewer.loadDocumentNode(viewerDocument, defaultModel).then(() => {
    viewer.restoreState(sceneState, null, true);
  });
};

const onDocumentLoadFailure = () => {
  console.error("Failed fetching Forge manifest");
};

Autodesk.Viewing.Document.load(
  `urn:${objectId}`,
  onDocumentLoadSuccess,
  onDocumentLoadFailure
);
CONCLUSION
We were able to connect Forge Viewer to our application and customize it to meet the needs of our users. We are also excited that users can now compare expected and actual construction results in one frame.
Subscribe for the news and updates
This article demonstrates how to use Python to automate yield calculations in decentralized finance (DeFi), focusing on the Renzo and Pendle platforms. It guides readers through estimating potential rewards based on factors like token prices, liquidity, and reward distribution rules, emphasizing the importance of regular data updates and informed decision-making in DeFi investments.

In one of our recent projects, we had an interesting case: the whole application was built around an interactive map for a fairly large shopping mall, and the main goal of the system was to plot the closest route to a user-selected destination.

Django ORM is a very abstract and flexible API. But if you do not know exactly how it works, you will likely end up with slow and heavy views, if you have not already. So, this article provides practical solutions to N+1 and high loading time issues. For clarity, I will create a simple view that demonstrates common ORM query problems and shows frequently used practices.
Designing database architecture is a challenging task, and it gets even more difficult when your app keeps getting bigger. Here are several tips on how to manage your data structure in a more efficient way.

Lead management is an important part of the marketing strategy of every company of any size. Besides automating various business processes, privately-held organizations should consider implementing an IT solution that would help them manage their leads. So, how should you make a web-based leads management system for a University in order to significantly increase sales?

We often handling API server updates including backwards-incompatible changes when upgrading web applications. At the same time we update the client part, therefore, we did not experience any particular difficulties.